Business mapping software is all about the data visualization of your business data. Business owners and sales managers derive business intelligence and strategies by viewing their business data against an accurate base map. So, what are the best ways to build a helpful business map? Sometimes the best business map to build is a customer map.
Customer mapping starts and ends with your location-based customer address spreadsheet:
1. Include Full Addresses – Create an Excel spreadsheet of your business data that references accurate address records. Don’t skimp on the address data. I know. You’re a wicked-busy person, and ZIP codes should be good enough. But if you’ve got addresses in your business system, use them. Create columns for address, city, state, and ZIP code in your spreadsheet. Alternatively, you can use latitude and longitude coordinates, which are even more accurate.
By using complete addressing, you’re providing your business map with the most realistic visualization of your critical business locations – your customers. If you simply list ZIP codes, you’ll get multiple business data points located or stacked at the exact location. That’s not your business reality. ‘Keep it real, brah.’ Use addresses.
2. Include Additional Data – Include any pertinent information that informs your business decision-making with imported business location data. Perhaps include a column showing sales results in dollars for each location. Does each customer fall into a specific category or type: retail, industrial, or government? Include a column for type. On your map, you’ll be able to color-code based on the data types or numeric ranges associated with your additional data columns.
3. Import Your Own Symbols – Perhaps customer logos or product jpegs will help your business map quickly communicate critical data to your business map audience. Medical maps often use medical symbols to reflect clinician disciplines – such as a stethoscope pic for doctors, life-saving symbols for nurses, and a tooth for the dentist. Your map needs to communicate quickly to your map viewers. Import symbols to help inform your map viewers.
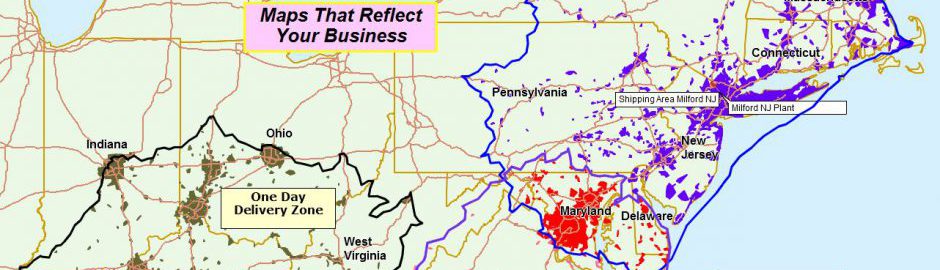
4. Define Coverage Areas – Areas of interest, sales territories, and medical coverage areas can be readily displayed as a function of an imported location data sheet. If ZIP codes, counties, or even Census tracts define your coverage areas, you can include a column that defines those location segments in your data. Import the list of ZIP codes representing a home care coverage area, include another column for any preassigned CNAs, and generate a coverage area map that displays a nurse for each ZIP code area. The ZIPs can be color-coded and defined in the map legend or key.
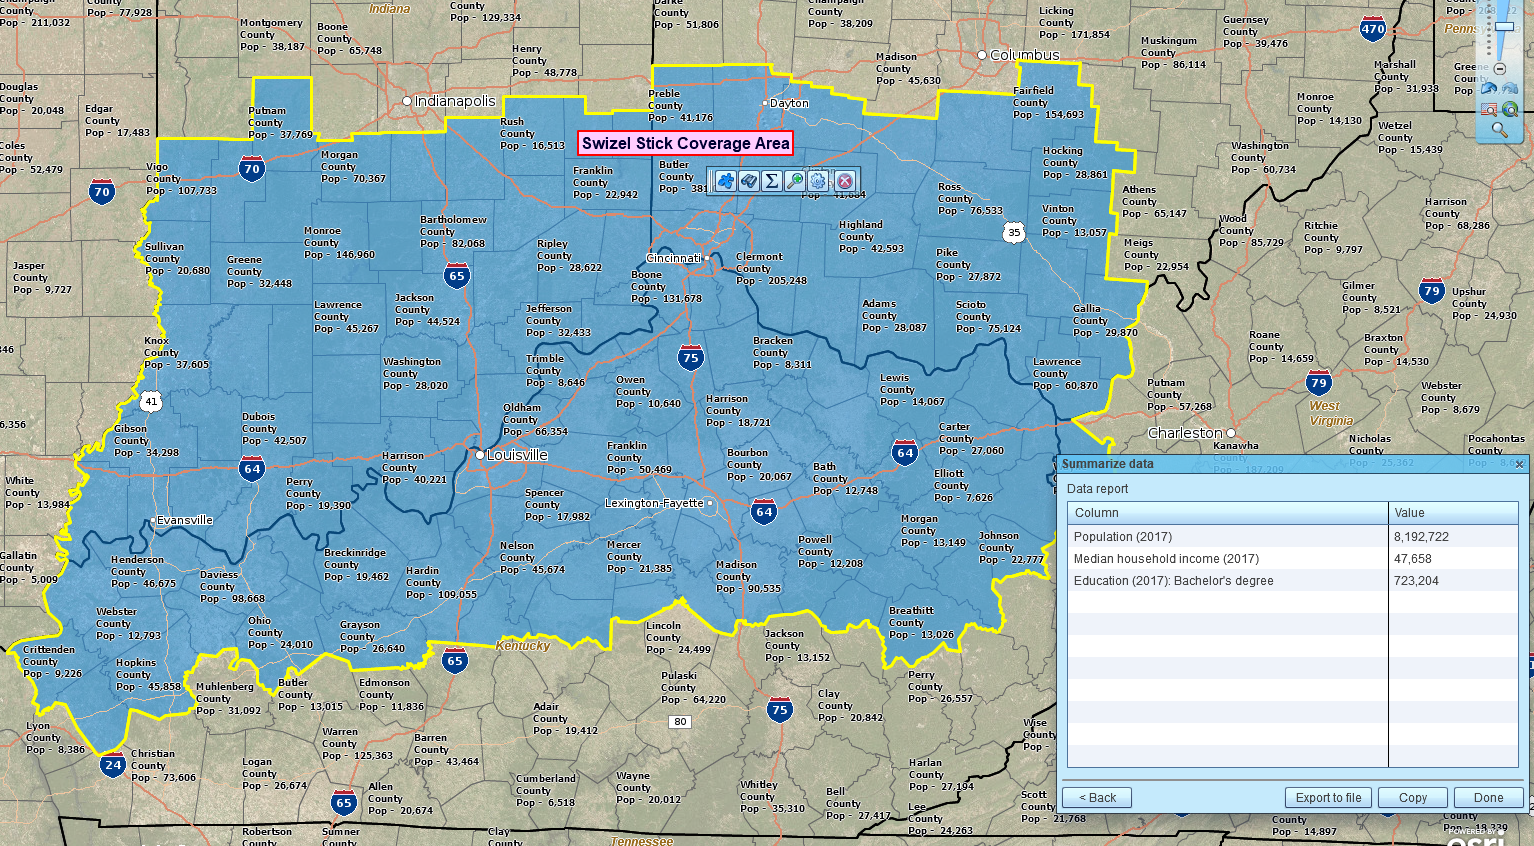
Our Swizel Stick Coverage Area
5. Double-check your data – I know. It’s you. You never screw up. But the old adage ‘garbage-in, garbage-out still applies. Make sure you don’t leave empty records where information should go. Review your address data – does it look right? No weird country abbreviations are included by mistake, right? It happens. In fact, it happens all the time. Take your time and double-check that the data you are importing is reliable location-based information. Your map and your map viewers will thank you.
To import your carefully reviewed customer address spreadsheet:
- Click the Dataset button in the Adding to Map section of the MapBusinessOnline Master Toolbar
- Click through the Plot Data Wizard page (which may be helpful) and in the Select Data wizard page, choose the From File Option. Navigate or browse to where your data is stored on your machine
- Select your data and click Open in the lower right
- Specify that your have headers defining your columns – Click Next
- Take some time to ensure your data Headers match the Address processing buckets in the dialogue page for plotting. In other words, make sure the Address box is pulling from an Address column, ZIP Code box is pulling from the ZIP Code column. This may seem tedious the first time, but it becomes routine. Once you’re confident with the process, you can often skip this step
- You will notice a Box for Unique ID. This is to enable mass data updates. Come back to this when you’re more comfortable with the tool. Click Plot
- MapBusinessOnline takes a few moments to process the geocoding and then plots points on the map and tells you how many points are plotted accurately
- The Data Window pops up showing your data in tabular form in MapBusinessOnline. The far-left column of colored dots tells you how accurately things are plotted. Shoot for Green and Yellow dots. Too many Red X’s tells you something isn’t right
With your customers now plotted on the map consider color-coding the data or optimizing your business map for specific business purposes.
The Wrap Up
Your location-based data sets are the key elements in deriving new perspectives on your business from business mapping. So think it through. An excel spreadsheet of ZIP codes alone won’t tell you much about where your customers and competitors are until you import them onto a business map and visually absorb the information. You’ll be amazed at what a zip code mapping tool like Map Business Online will do for your perspective.
Imagine going on an automobile trip around New England with your family for a week. Would you bring just a spreadsheet of all the planned stops and use that to navigate and determine driving times? No way. Your significant other would significantly kill you. A travel map will pull your family through vacation travel. Well anyway, it’s the same with a business map. Turn that spreadsheet into a data-filled business map and start viewing your business strategically.
_______________________________________________
Discover why over 25,000 business users log into www.MapBusinessOnline.com for their business mapping software and advanced sales territory mapping solution. The best replacement for Microsoft MapPoint happens to be the most affordable.
To access MapBusinessOnline, please register and download the Map App from the website – https://www.mapbusinessonline.com/App-Download.aspx.
After installing the Map App, the MapBusinessOnline launch button will be in the Windows Start Menu or Mac Application folder. Find the MapBusinessOnline folder in the Start Menu scrollbar. Click the folder’s dropdown arrow and choose the MapBusinessOnline option.
The Map App includes the Map Viewer app for free non-subscriber map sharing.
Please read customer reviews or review us at Capterra, or g2crowd
Contact: Geoffrey Ives geoffives@spatialteq.com or Jason Henderson jhenderson@spatialteq.com