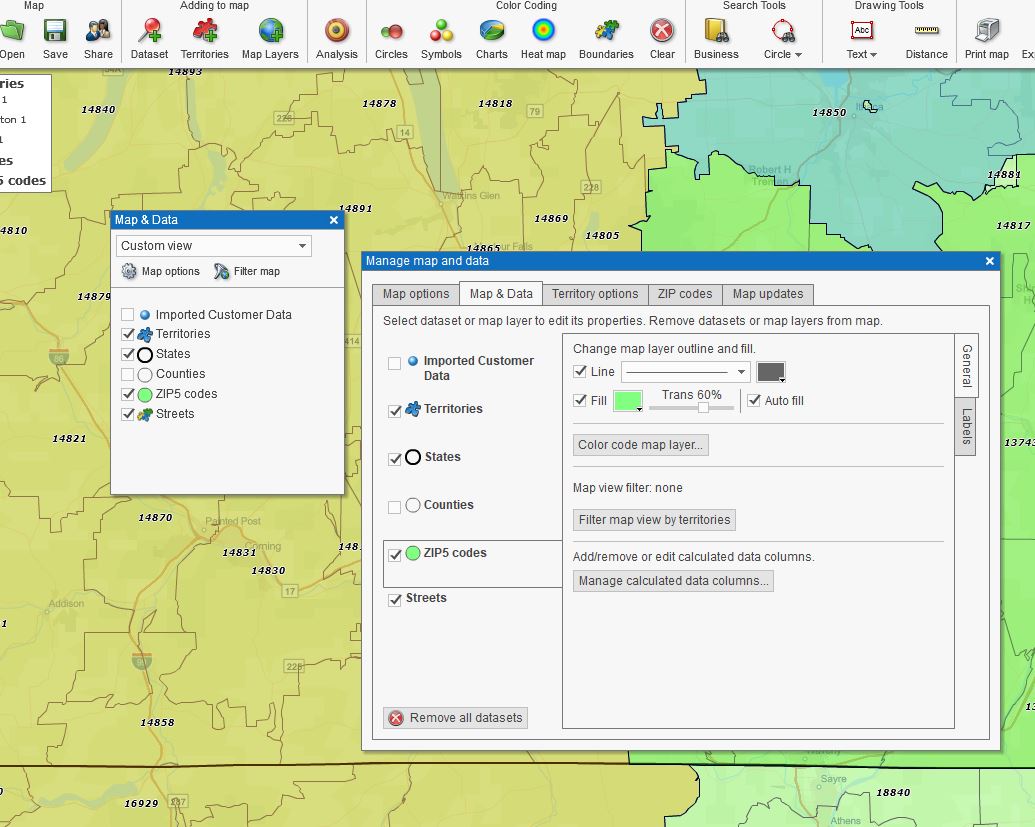
When new business map users of MapBusinessOnline first open up the application, they notice a light gray box off to the left called Map & Data (M&D). You’ll see that Map & Data shows a list of Map Layers with checkboxes. Map & Data is a critically important tool to MapBusinessOnline users. Map & Data allows MapBusinessOnline users to do the following:
- Turn off and on the various data and map layers you plan to use in your business map. Check on and off your imported business datasets or included administrative districts, and even your background map
- Control the transparency of shaded geographic layers, territories, and areas of interest
- Tweak the boundary color and thickness options, turn off internal boundaries
- Adjust the labeling of geographic layers and imported business data layers
- Choose from a variety of background base map layers – Streets, Satellite, and Topographic layers
- Filter the map view by state or groups of states
- Control sales territory layer options for transparency and overlap
- Choose the ZIP code format your map will apply moving forward
- Apply Calculated Data Columns, used to combine like demographic categories
- Misc. map adjustments like – Legend updates, Map Title, Miles vs. KMs and more
- Set map defaults for ZIP codes, Territory overlap, and Search options
Phew! That’s a lot of functionality for a little, floating gray box,
Where Did it Go?
Map & Data can be turned off easily by clicking the ‘X” in the upper right-hand corner. To turn it back on find the gray arrow tab on the far Left side of your map screen halfway down, and click it open.
Layer Drop Down
You’ll notice a layer drop down in the Map & Data toolbar. This toolbar allows the user to set a map up for just a specific map layer. In general, I leave that drop down option at Custom View. The other views provide template map views for commonly used map layers. Stick with custom until you find a commonly used approach in your business mapping.
Map and Data Opened Up
Map & Data Editing Access
MapBusinessOnline users access layer editing functions in Map & Data by either clicking the Edit Gear on the M&D tool bar, or by hovering over a given layer and clicking the Edit Gear that pops up.
By using the overall M&D toolbar and clicking Map Options, the user opens a panel view with background options and the Filter by State tool, the Map Title control, the Map Legend control, and the Delete Draw Layer control. The user can also convert miles to kilometers here.
From this high level Map Options control panel, access individual layer controls by choosing the “Map & Data” tab along the top. Place your cursor in the light blue areas to edit specific geographic layers like ZIP codes. The geographic map layer must be checked on to enable layer editing.
Read More About Creating New Maps
You could forgo the selection of the overall toolbar for Map &Data and instead hover over any geographic or imported dataset until the Edit Gear pops up. Click that edit Gear and enter the editing functions for the dataset you choose.
Either way, once you are in the data layer of choice, you can select which Tab to edit – General or Labels, they are listed in vertical text along the right side.
The General Tab enables map layer outline or border adjustments for thickness and color. It also presents a transparency scrollbar. You can also color code your layer objects here – such as counties. General also offers the Calculated Data Columns option for combining or summing related demographic data layers.
The Labels Tab enables the ability to manage layer labels. We define the various layer labels like this:
- Auto label – That’s the state, zip code or county name label
- Custom label – That’s the label that pops up when you hover over a state, zip code or county
- Territory label – That’s labels associated with territories based on state, zip code or county
On of the coolest things you can do in MapBusinessOnline is append data to a label. Try it. Add demographic data or data you imported to a label. It’s a great way to present key data to your map viewers. Read more about appending data.
Territory Options
When you click the Map & Data overall toolbar Edit Gear you’ll also see Territory Options in the panel control view. Here you can set territory transparency and turn on the intersection or overlap tool. The ability to allow and identify territory overlap is extremely helpful in a sales territory mapping program. And you’ll see that you can control the color of the overlap by clicking into the associated color box.
In this way MapBusinessOnline lets the map creator define areas of overlap. So whether or not overlap is a good thing or a bad thing in your business, MapBusinessOnline at least allows you to address it.
ZIP Code Setup
Also noted included in the Edit Panel view tabs, all the way to the right, is the Zip Code tab. Click here to reset the origin and capabilities of your ZIP code layer.
MapBusinessOnline comes with Census ZCTA ZIPs turned on. For greater flexibility in generating ZIP code territories try USPS ZIP codes with fillers. This will allow your territories blend in with national park areas. You’ll see explanations of the various zip code layer options listed there as well. An interactive ZIP code map like MapBusinessOnline is a great way to display and analyze business details. Read more about ZIP codes here.
Spatial Search Options
To edit the spatial search options in MapBusinessOnline, click the Map and Data Map Options button. In the panel that opens scroll to the bottom and click ‘Edit Search Options.’
Here you can determine how your searches by radius or polygon or drivetime polygon collect data. Note the mode options:
- Intersect – the spatial search will include map objects (ZIP code) touched
- Intersect at 50% – the spatial search will include data for those objects intersected at 50%
- Fully inside – the spatial search will only include objects fully inside the search parameter
Experiment
Jump right into MapBusinessOnline and create some maps using various aspects of the Map & Data box controls as well as the Master Toolbar. This is a great way to learn how MapBusinessOnline can help you use business mapping software to support your business.
___________________________________
Find out why over 25,000 business users log into www.MapBusinessOnline.com for their business mapping software and advanced sales territory mapping solution. The best replacement for Microsoft MapPoint happens to be the most affordable.
To access MapBusinessOnline, please register and then download the Map App from the website – https://www.mapbusinessonline.com/App-Download.aspx.
After installing the Map App, the MapBusinessOnline launch button will be in the Windows’ Start Menu or Mac Application folder. Find the MapBusinessOnline folder in the Start Menu scrollbar. Click the folder’s dropdown arrow and choose the MapBusinessOnline option.
The Map App includes the Map Viewer app for free non-subscriber map sharing.
Please read customer reviews or review us at Capterra, or g2crowd
Contact: Geoffrey Ives geoffives@spatialteq.com or Jason Henderson jhenderson@spatialteq.com