MapPoint migration tips
Since MapPoint has been discontinued in Dec 2014, many MapPoint users find MapBusinessOnline (MBO) as the best alternative to MapPoint, both by price and features. And there is the reason for that. MapPoint and MBO have common history in certain sense. In 90s and early 00s MapPoint was in head to head competition with another business mapping product – Esri BusinessMAP. In 2010 the former BusinessMAP development team joined forces again to build new innovative cloud-based business mapping product – MapBusinessOnline.
Where do I find MapPoint feature counterparts in MBO?
Let’s start by looking at how MBO performs major MapPoint workflows.
- Data import. To plot your data from an Excel file you would go to Data menu and choose Import data wizard or Link data wizard items in MapPoint. In MBO you’d use Plot data wizard instead. That’s the red pushpin with plus sign icon on the main toolbar.
 Requirements to input Excel file are pretty much the same for MapPoint and MBO.
Usually Web App imports data file while Windows App links to data file.
- Thematic maps. MapPoint has Data mapping wizard. It pops up at the end of Import data wizard or you can call it from Data menu. In MBO we call the feature color-coding. By default MBO plots locations as Pushpin map in MapPoint terms. You can choose Shaded & Sized Circles, Multiple Symbols, Pie/Bar/Column Charts, Shaded Area color-coding options from the main toolbar in MBO.
 There is also the Heat Map option not available in MapPoint.
Check these links for step-by-step color-coding instructions: Change dataset symbol, Color code dataset locations on map, Color code ZIP codes, counties, and states.
- Territories, manual mode. In MBO you start creating territories by selecting (clicking) geography (area) on map. Very similar to MapPoint. But (a) you can use Shift key to select several areas at one time (b) you don’t need to click into area label – just in any place inside the area (c) toolbar with blue puzzle icon appears for you to hit to create or update territory. Take a look at these articles for details: Manually create territories one-by-one, Design sales territories by county or state.
Unlike MapPoint, MBO allows you to build territories based on various alignment layers on one map. In other words one territory can be built from counties while another from ZIP codes.
- Territories, from file mode. There is puzzle with plus sign icon on the main toolbar that will start Create territories wizard.

In addition to creating territories MBO also imports your territory file as set of locations. MBO builds territories through location match. That means you don’t need to have county columns in your data to build territories by county. One use of it is creating initial set of territories from customer file. For example if you have customer file with Sales rep column then you can build Sales rep territories from the file by ZIP code or Census tract.
See these articles for step-by-step instructions: Visualize sales territories by ZIP code, Visualize sales territories by county or state.
- Drawing. Drawing tools are available from Drawing toolbar in MapPoint. In MBO we have drawing tools on the main toolbar. There is also search version of some of the tools (icons for the tools have binocular symbol) that can be used to search plotted locations or base map areas spatially.
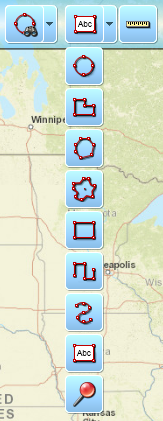
- Routing. MBO routing features are available from Route window that you can open by clicking green car icon on the main toolbar.

Data migration
To migrate a dataset from MapPoint map use instructions below:
NOTE: there may be some differences from steps provided below depending on version of MapPoint you use.
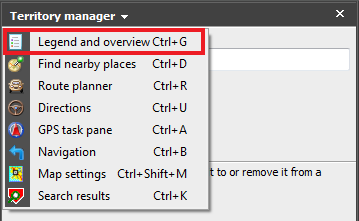
- Select Legend and Overview option to see datasets available on the left pane.
- Right click a dataset you want to export and choose Export to Excel item in drop-down menu.
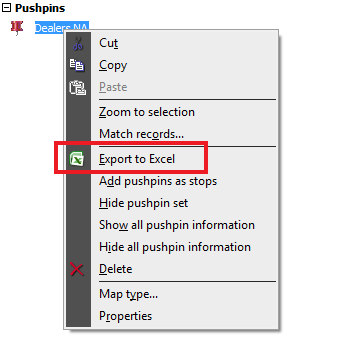
- MapPoint will open Excel with dataset content.
- Save that Excel file on disk.
- Follow these instructions to plot the file in MBO: Plot data from Microsoft® Excel.
- While MBO will import all data records, you may still have to choose pushpin or data mapping options as described above.
Territories migration
To migrate territories created in MapPoint map follow instructions below:
NOTE: there may be some differences from steps provided below depending on version of MapPoint you use.
- Select Legend and Overview option to see datasets available on the left pane.
- Right click territories layer and choose Export to Excel item in drop-down menu.
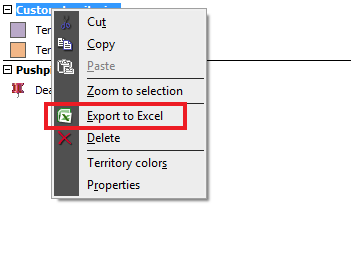
- MapPoint will open Excel with territories.
- Save that Excel file on disk.
- Follow these instructions to re-create territories in MBO: Visualize sales territories by ZIP code, Visualize sales territories by county or state.
- Once your territory map has been re-created you may want to change territory colors to match those used in MapPoint: Change territory color.